
Related Articles


Learn Photography With These Simplified Tips.
Here are a collection of various photography tips which are presented in their simplified form. These are easy to understand illustrations that will help you to understand the basics and take your photography to next level.
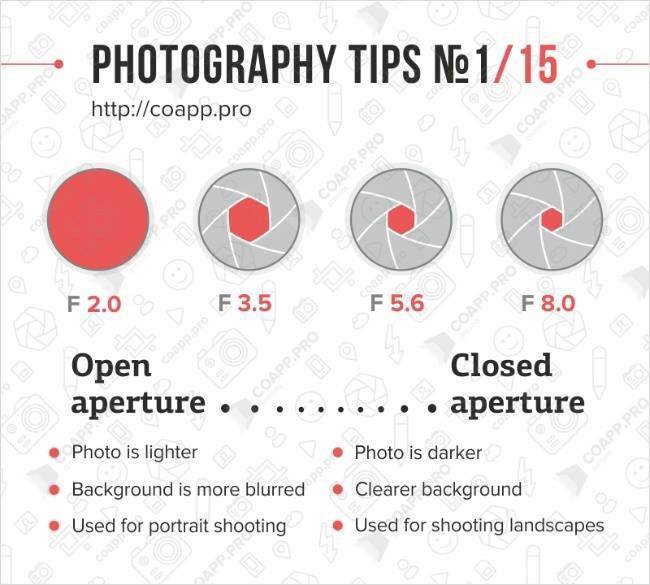
- Aperture: Wider aperture means more light can enter the lens. This means it will be useful under low light conditions. Smaller aperture will cut the amount of incoming light. This may be useful when the sun is bright. Using wide aperture also results in smaller focus window which means more background blur. Smaller aperture is used for landscape photography where everything needs to be in focus. Lens with wide aperture generally costs more and are called prime lenses. Eg. 50mm f1.8
(this is inexpensive and value for money lens), 85mm f1.8
, 24-70 f2.8
, 70-200 f2.8
.
2. Shutter Speed: It determines exposure. Actually there are three factors ISO, Aperture and Shutter Speed which determines the final exposure value. Shutter speed means the shutter inside the camera will be open for that much of time and the sensor will be exposed to outside light for that time period. Fast shutter speed is used to freeze the subject like in wildlife and sports while slow shutter speed is used for long exposure photography like when capturing light trails and lightening.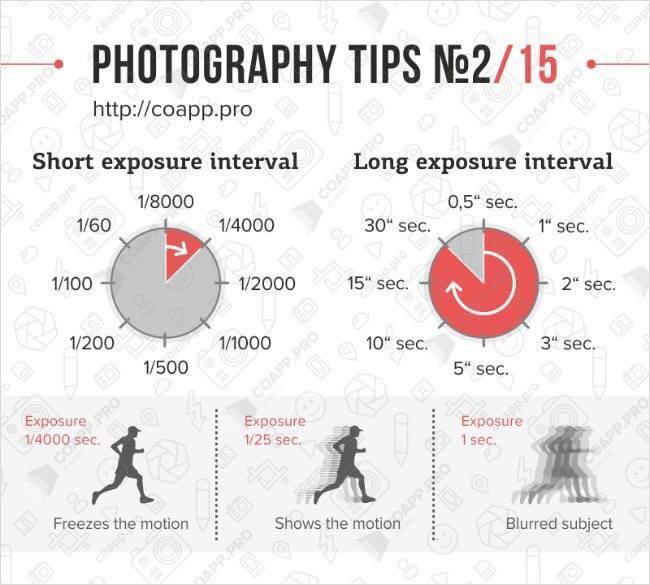
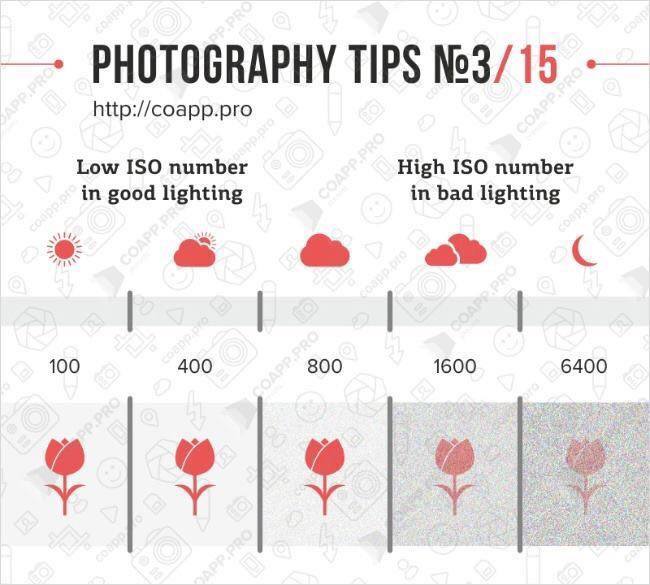
3. ISO Settings: ISO refers to the sensitivity of the camera sensor towards incoming light. Higher sensitivity will result in increased exposure value. It is very useful under low light circumstances. Cheaper cameras and sensor tend to show image noise at higher ISO level. Expensive cameras like Full frame DSLRs show less amount of noise even at higher ISO level. This means better low light image. Some of the best low light performer cameras for serious hobbyists are Sony Alpha7


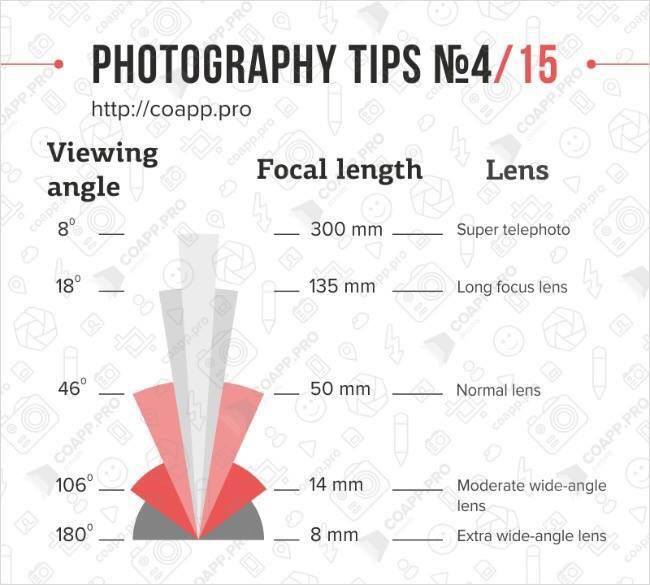
4. Focal Length: Focal length determines the angle of view and zoom ratio. Higher focal length means more zoom. Smaller focal length means wide angle of view. Both are useful. Wide angle lenses

5. Composition: Composition refers to how and where you place the subject in the frame. Composition is very important aspect of photography. A simple photograph may standout due to good composition. There are many defined types of composition of which ‘rule of thirds’ is the most common. The subject is placed at one of the intersection as shown below. Composition brings impact in photography.
Read more about Guidelines of Composition.

6. Positive and Negative Framing: It is achieved by placing the subject in certain way. The subject may be framed in a way to show positivity or negativity. Generally it follows where the subject is looking. When there is no human subject follow the instructions given below.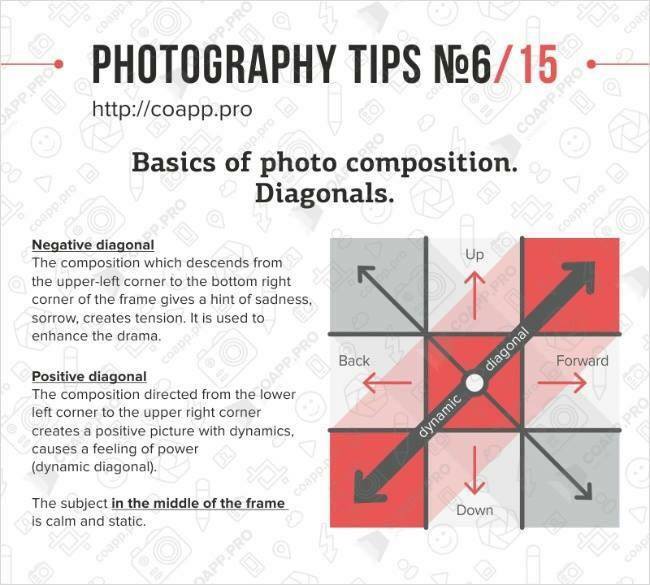
7. Colors: There are only three primary colors viz. yellow, blue and red. Just like painting, these colors are responsible for all the secondary and tertiary colors in a photograph. While shooting photographs they will stand out. You can use props or elements of complementary color scheme to compliment the primary colors in your photograph.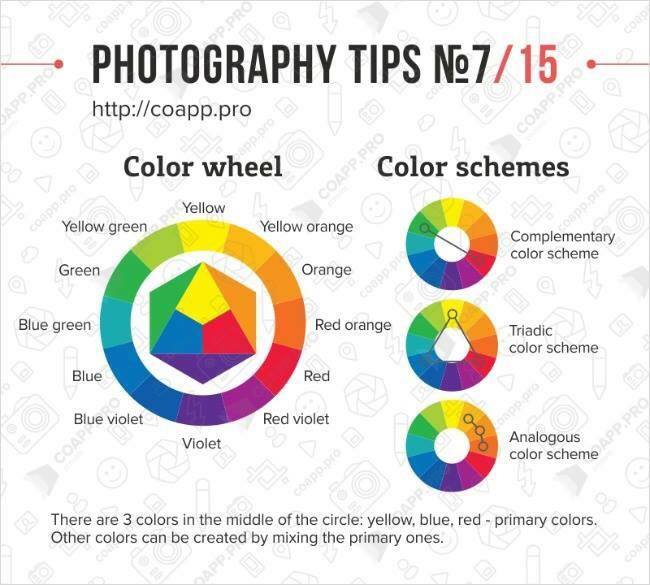
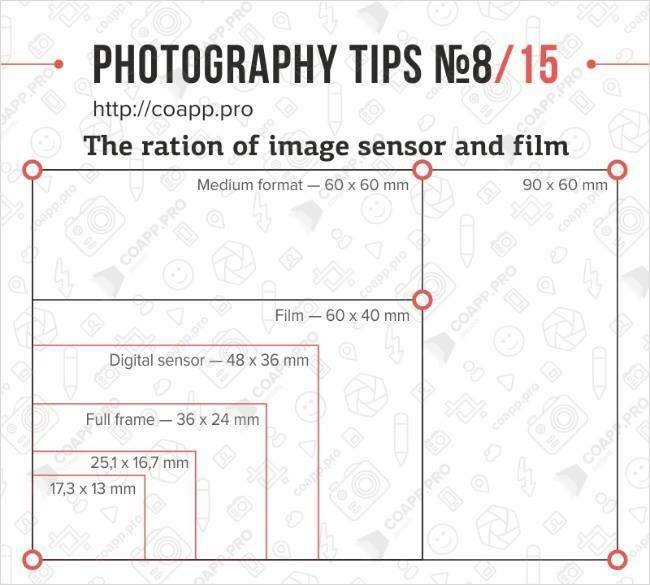
8. Size of Sensor: Sensor is the single most important part of a camera system. The outside light reaches the sensor through the lens and is sensed by the sensors in terms of intensity of primary colors. This is then translated electronically to form a final photograph. Size of sensor determines how much date can be interpreted at an instant.
Read in detail about Full Frame vs Crop Sensor Camera.
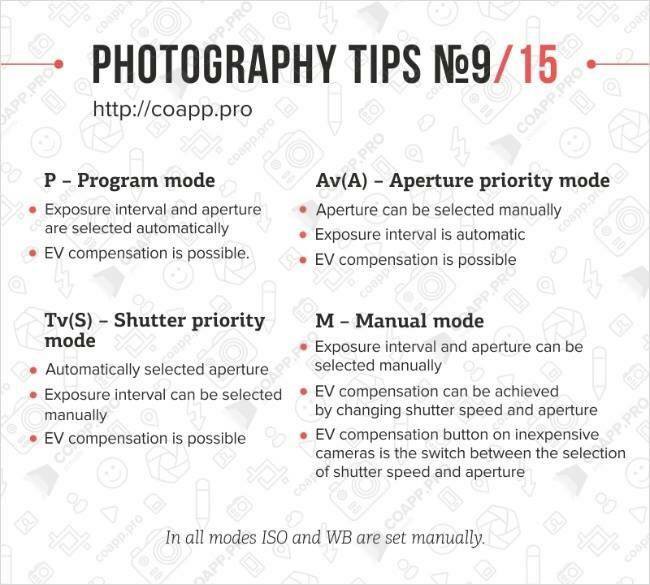
9. Camera Modes: There are different camera modes on the camera depending upon its type. They can be used for various settings. Auto mode lets camera control most of the settings while full Manual mode will give you the option to set all parameters manually.
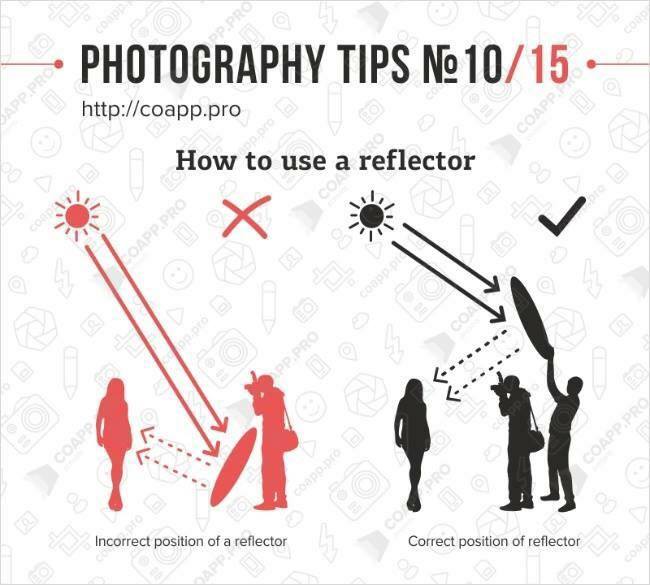
10. Reflectors: They are wonderful light modifiers. When there is not enough light or the sun is not in correct direction then it may bring harsh shadows on the subject and it may look flat. Reflectors fill in the shadows to give a dynamic image with better features. There are various types of reflector which reflect different tone and warmth of color. The all-in-on reflector
11. Bokeh: Bokeh or Blurred background is the most sought after feature of a DSLR by most beginners. However it should be used logically and do not use the feature to blow out the background out of every shot. A common rule to get good bokeh is that the subject should be little far from the camera as well as background and zoom in little.
Read in detail about How to get perfect Bokeh.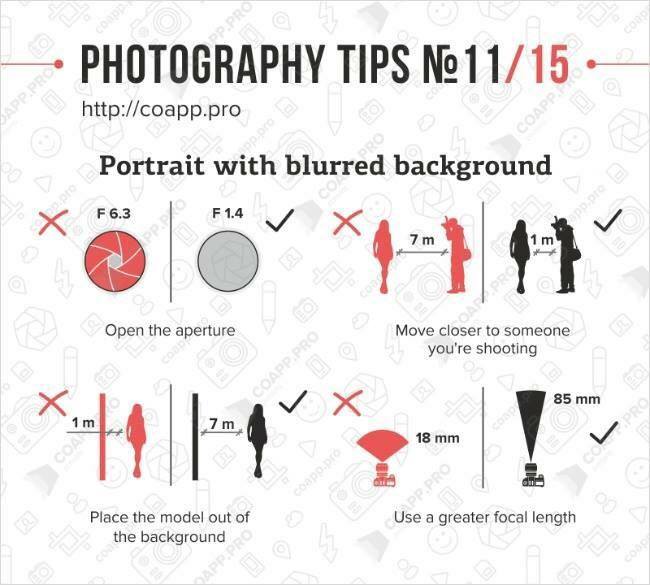
12. Framing: Framing is not only useful for portraits but also for landscapes and street photography. The best photographers use framing very creatively to bring a unique perspective to a photograph. It is also useful when you are trying to tell a story through your photograph. Look out for natural frames present in your surrounding and use them to your advantage. While shooting semi body portraits, crop off at specific part as explained in the illustration below.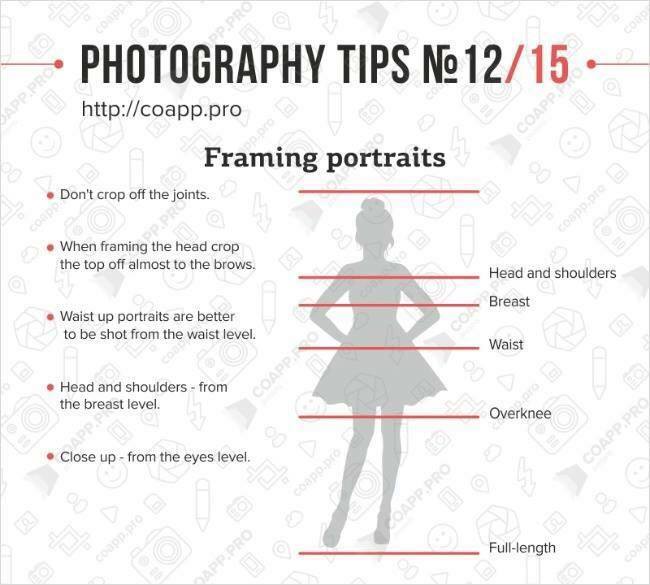
13. On Camera Flash – Direct vs Bounced: Direct flash will give you flat images with less features. Use this trick to bounce off the light from ceiling to get better light. You can also wrap a thin layer of tissue paper on the on-camera flash to get softer light. 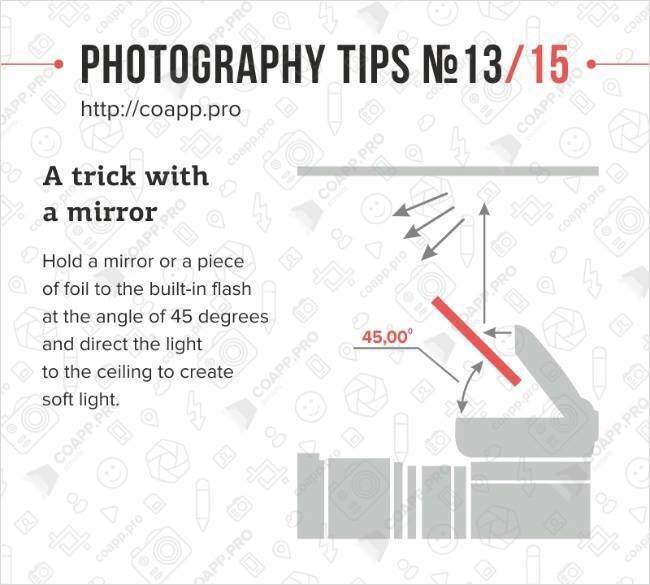
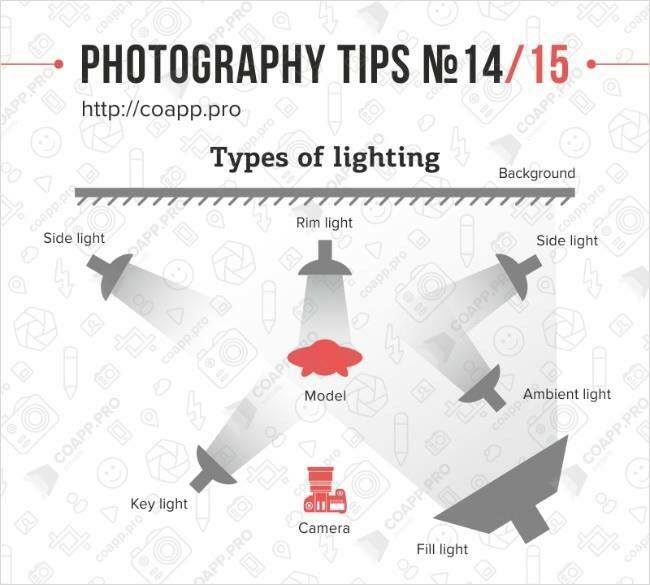
14. Types of lighting: Lighting is the most important aspect of photography. When there is not enough natural light to work with or to create different lighting scene one must learn to use artificial sources of light. Here are the different types of lighting. You can get yourself a studio setup
15. Flash Photography: There are various ways of using a flash. You can use it on camera or take it off camera and use radio triggers

If you want to learn more about working with flash and strobe lights then there is no better source on internet than David Hobby’s Blog called Strobist. 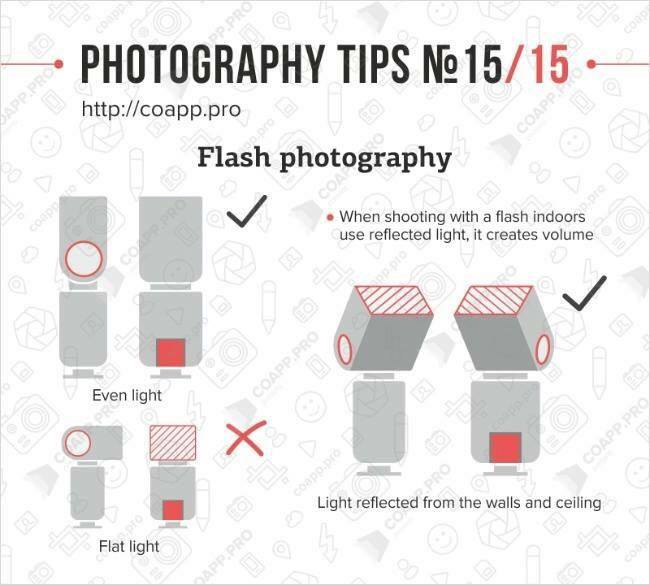
Now, Read about the Top 10 Dream Lenses.
We hope this “Learn Photography With These Simplified Tips” was useful for you. Don’t forget to share with your friends and leave a comment below if you have any question in mind. We would be happy to help.
Truly Informative! 🙂