Related Articles


One of the most commonly asked questions in photography is about taking photos with blurred backgrounds. And why shouldn’t it be? It’s pretty damn cool to have a blurred background in photos. It also helps draw attention to the main subject in a photograph. In this detailed blog post, you will learn How To Take Photos With Blurred Backgrounds.
The blurred background is technically called bokeh. It is represented by the depth of field in photography. Anything that is outside of the focus window of the lens gets blurred and stays out of focus. Creating a shallow depth of field separates the subject from the foreground and background. The subject stands out and pops out of the photograph. Bokeh is visually pleasing.
The blur is determined by the aperture of the lens denoted by the F-stop. In simple terms, a wider aperture will have better blur. There are a couple of components to this and how it works. Just follow these simple steps to achieve blurred backgrounds. However, many other factors influence the background and foreground blur in photographs.
Before we start, remember this golden trick on How To Take Photos With Blurred Backgrounds:
The background should be far from your subject. The camera should be relatively closer to the subject. You should zoom in on your subject with the widest possible aperture.

Steps to get Background Blur in Photo
Follow these steps to get a better background blur in photographs.
Set Aperture Mode
Set your camera to AV (Canon) A (Nikon) or M mode. AV/A is Aperture priority mode. In aperture mode, one controls the aperture settings while shutter speed is determined by the camera.
Set F-stop
Set your F-stop to the smallest number it allows such as f1.8, f5.6, or whatever number your camera goes down to. Aperture settings depend on the type of lens you are using. Normal kit lenses go down till f3.2 and prime lenses like 50mm may go up to f1.8 or even f1.2 depending upon the model. A very large part of a blurry background is caused by a wide f-stop like 1.8, 2.8, or as wide as your lens opens be it 3.6 or even 4. The wider your f-stop is, the smaller the depth of field will be. Depth of field is the amount of the photo that will be in focus. So, if you focus on your subject’s eyes with a very shallow depth of field, the focus will not cover the background. If you are confused about setting f-to then read here.
Balance the Exposure
Check your other exposure settings such as your ISO and shutter speed. If you’re in AV/A mode your shutter will automatically set itself and you only need to set your ISO; However, if you’re in M mode then you need to set everything yourself. Set things until the exposure is correct. Correct exposure means a balance between the darkest and brightest areas in a scene. When you learn how to take photos with blurred backgrounds, it is also important to maintain correct exposure.
Use Prime Lens
Prefer a prime lens with a large aperture. They are expensive but worth it. The longer the focal length of the lens, the more background blur you can get! A longer lens allows you to get further away from your subject and zoom in, which will create greater amounts of blur. You can get amazing background blur with 50mm f1.8


Kit Lens vs Prime Lens
Now while that all seems nice and easy, the challenge depends on the type of lens you use. The type of camera you own doesn’t create your F-stop. Your lens does. So if you have a lens that only allows your camera to go to 5.6, like the 18-55 or 18-104 or 18-140mm, then you’re not going to get as blurry of background as someone that owns a lens that goes down to 1.8. When you don’t own the type of camera that allows you to swap lenses, then you’re stuck with whatever you own. But that’s not the end. You can always try the golden rule for blur background.
Still stuck with your kit lens then read the list of best lenses to upgrade from the kit lens.
Understanding Blurred Background Photography
Now for those of you that want to know what it all means and how it works, the below in-depth explanations are just for you. Follow the details to understand how depth of field wors to give a better background blur in photos.
Open your aperture (“F-stop”) to the widest value.
For experienced photographers, it seems easy enough, right? Changing the setting is easy, but explaining what your aperture is in the first place is a little more detailed. That way you know what the difference is between “open” and “closed” and all of the settings in between. Especially for anyone reading this that’s currently thinking “an F-WHAT?”.
Explanation of your F-stop (Aperture):
When you click the shutter button on your camera, a hole opens up that allows your camera’s image sensor to catch a glimpse of the scene you’re wanting to capture. A sensor is the eye of the camera. The Aperture (F-stop) that you set impacts the size of that hole.
Think of your eyes as a camera aperture. When it’s bright outside, your pupils close and let less light in so you see more clearly. In the darkness, your pupils open to let more light in. So think of your Aperture as the pupil of your camera that you have complete control over.
To create a more shallow (blurry) depth of field, you need to be able to allow the MOST light to come in as possible which means OPENING your Aperture (f-stop) to the LARGEST opening. If you want more of your background in focus (such as a landscape shot) then you do the opposite by CLOSING your Aperture to the SMALLEST it will go to allow LESS light in.
So this means:
Open Aperture = More blurry
Closed Aperture = Less blurry
Make sense? If not, here’s a little example of what the same picture looks like with two different Aperture (F-stop) settings:
The F-stop Settings:
The numeric value associated with your Aperture settings is read using decimals such as 1.4, 2.8, 4.0, 8.0, and so on. So if you have ever noticed these numbers on your camera lens in the metadata of photos – now you know what they are.
What can make this so confusing is that the smaller the number, the larger the Aperture. The larger the number, the smaller the Aperture. So it’s incredibly counterintuitive until you get the hang of it.
A basic chart of the more common f-stop settings with a visual guide of the actual appearance of the aperture is shown below. The white space inside the circles is the opening. The black part is the aperture blade. You can see that f22 is quite closed down whereas f2.8 is wide open.

How to set your F-stop on your camera
Unless you’re familiar with ISO and Shutter speed, I would probably discourage you to use your Manual (“M”) settings on your camera because regardless of what your f-stop is, you need to have correct exposure.
Instead, use your “AV” mode (or sometimes “A” mode) which stands for “Aperture Priority”. This allows you to choose your f-stop and ISO but your camera will choose the shutter speed for you based on the lighting conditions.
Set your F-stop to the smallest number your camera will allow you to set which means wide open.
Best Lens for Background Blur
Longer lenses create a more shallow depth of field than shorter lenses. So if you have a lens that you can’t swap for a longer one, zoom in as much as you can while protecting the clarity. Also, move your subject away from the background. If you’re taking a picture of a person and you want the wall to be out of focus, have your person stand a few feet away from the wall to give you maximum depth of field.
Now that you know the theory, let’s see some practical examples and effects of different lenses and focal lengths on background blur.
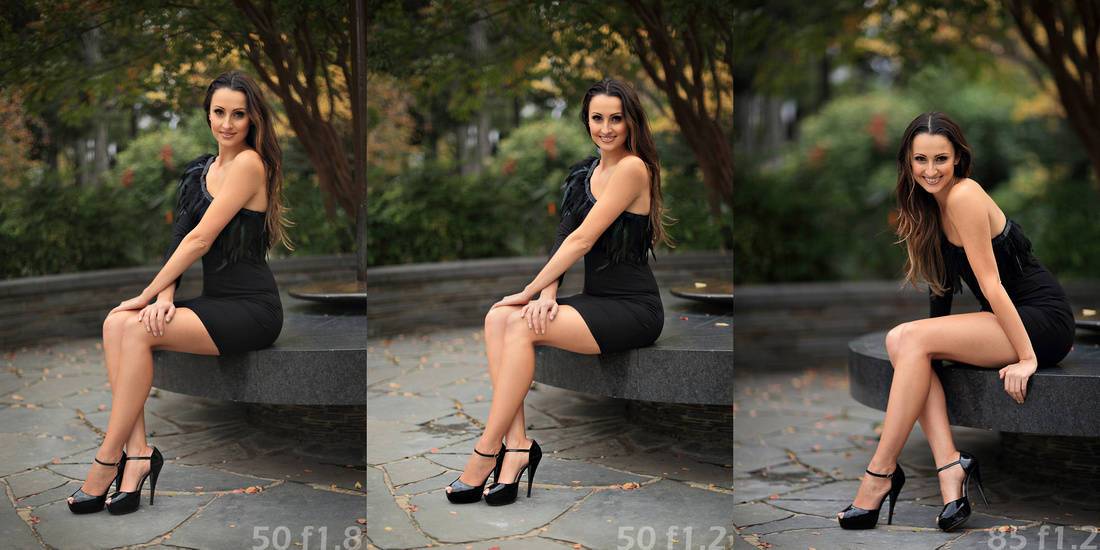
 50mm f1.8 vs 50mm f1.2 vs 85mm f1.8 (notice the background blur)
You can notice in the photo above that 85mm f1.2 is a clear winner with the highest background blur. But even the much cheaper 50mm f1.8 does exceptionally better than your kit lens.
Effect of Zoom on Background Blur
Below is an example of how zooming into the subject will enhance the background blur (shortens the depth of field).


Master these basic principles & practice a lot and you will get better-blurred backgrounds with the best bokeh. This concludes our guide on how to take photos with blurred backgrounds. Leave a comment below and share it with your friends. Need any explanation or help with the blurred background? Ask us in the comments below.
If you need prime lenses then check this recommended list for the best prime lens. These professional lenses will help you to get fantastic image quality and pleasant bokeh.
Could you please explain to De-focus the background in Sony HX200V…?
Defocus mode in a sony bridge camera does not work optically. Its the software that differentiates between subject and background. Then the software applies blur to background part. But the transformation from sharp to blurred part will not be gradual.
This is very helpful. Great post. I’m not a pro photographer but I really like photography. I’ve been seeing these numbers on dslrs lenses but I never knew how to correctly use them. thanks
This Article was very helpfull to me . I really like it.
Please provide us such helpful information.
Thankyouj!
Everybody does not purchase an expensive DSLR camera to capture/snap.