Related Articles


HOW TO USE CAMERA METERING MODES
If you are having trouble with your digital camera metering modes, we are here to help you. First of all, you should know what metering mode is. Basically, the metering mode is the way your camera determines the exposure. Read How To Use Camera Metering Modes.
There are two types of metering:
- Incident metering
- Reflective metering
Incident metering
Incident metering reads the intensity of light falling on the subject that you are taking a photo of and it provides accurate exposure of its tone, color, and contrast despite the background color, brightness, or subject texture.
Reflective metering
Reflective metering reads the intensity of the light that is reflecting off of the subject that you are taking a photo of, so it can be easily fooled by its tonality, color, contrast, textures, shape, and background brightness. Reflective metering reads that reflected light very well, but the problem is that it doesn’t take any other factors of the scene into a count.
In order for you to understand, we should start with the basics which are TTL (through the lens) metering. You know that cameras have a built-in light meter that tells the camera how to set the aperture and shutter speed in the exposure triangle. But how does that work? Well, TTL metering is actually reflective light metering so when the light comes in from the source (the Sun, the light in your home…) it reflects off of your subject. Then that reflection comes through the lens into your camera and into the light meter that measures all of that light. What meter is looking for is middle grey (18% grey), so it takes all the light values (all the bright and dark tones) and blends them to get that middle grey. Your light meter finds the middle grey of your scene and according to that color, it sets the exposure.
Camera metering modes:
- Spot metering
- Partial metering
- Average metering
- Center-weighted average metering
- Matrix metering
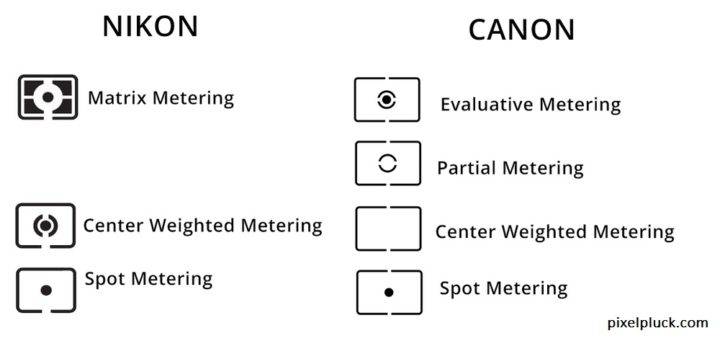
Spot metering:
With spot metering, your camera actually takes a small area of your scene, about 1-5% of the scene, usually right in the center, and takes those luminance values and figures out what middle grey would be on that. Some, but not all cameras allow you to move that spot around, based on your auto-focus, to be more accurate. Spot metering mode is being used when you want to focus on one specific area in your scene and want to meter that part correctly. A lot of people use this type of metering for the zone system. The tricky part is positioning the test area over the correct part of the subject. If you learn how to do that you will have good exposure based on the mid-tone.
Partial metering:
Partial and spot metering modes work very similarly. The only difference is that partial metering takes a larger area of the scene, about 10-15%. The best situation for using partial metering is when the background is a lot brighter than the subject unless you want to get just a silhouette. It’s a really good solution to back lightning problems. It’s also really good when you want to meter someone’s face correctly or something that you want in focus or even nature and wildlife photography.
Average metering:
Average metering has been around for ages. It takes the entire scene and it blends all of the tones to find that middle grey, but it tends to get things wrong. If you have, let’s say, a Sun just in the corner of your scene, well it gets just as much mixed into blending, so maybe the rest of the scene can be a little unexposed.
Center-weighted average metering:
Center-weighted average metering was made as a better solution for average metering. It takes about 60-80% of the scene (it feathers out as it goes) and it’s positioned in the center (that’s why it’s called center-weighted), so it uses that area to deter exposure. It works a lot better than average metering because a lot of people point their cameras at their friends or family and position them in the middle of the scene. Advanced photographers use a center-weighted average metering sort of like spot metering or partial metering to figure out which part of their scene they want to measure.
Matrix metering:
Matrix (evaluative) metering (also called pattern metering, honeycomb, esp -electro selective pattern, segment metering), is a newer way to meter light that uses all of the processing power of your digital camera. It breaks your scene into different zones or smaller sections and uses them to evaluate your scene. Then it puts it into an algorithm that different camera manufactures have created, which gives much more intelligent exposures (because maybe one of the zones is really bright and others are darker…). This metering highly recommended because it’s the most advanced.
So, basically, your cameras built-in light meter averages everything to a middle grey to determent proper exposure, but also because of that, your meter could make a mistake. You can correct your camera errors using exposure compensation. But what is exposure compensation, you might ask..
Exposure compensation
If you are a beginner photographer that just replaced your point and shoot camera with a DSLR, this might sound confusing, but it’s actually really simple. Exposure compensation is a feature on your camera that allows you to tell your camera to take what it thinks is correct exposure and overexposed or underexposed by a certain amount. You will find the exposure compensation button on your camera with the “+/-“ icon ( if you can’t find it check in your user menu where exactly to find a dial, because it’s not the same for all cameras). This option gives you a lot of power as a photographer to fine-tune your exposure, especially in low- light and high-contrast scenes.
What a PLUS (+) setting does is making your image brighter and MINUS (-) setting is making it darker. Each movement of brightness is called “STOP”. A full stop change doubles or halves the amount of exposure depending on whether it’s a plus one (+1) or minus one (-1) adjustment. Adjustment of +1 EV will give you an image that is twice as bright as the base exposure, and obviously, adjustment of -1 EV will give you an image that is half as bright as the base exposure.
One of the situations in which you might want to use this basic technique for adjusting the exposure is when your subject is brighter or darker than the entire scene or when your subject has a lot of light on it but the rest of the scene is dark. If your subject is backlit, when the camera meters the backlight, it will make your subject darker (that could be corrected by increasing the exposure compensation +1 EV or +2 EV). Also, when the subject is in a dark area you should get the exposure right for the subject and then let the background be as dark as it needs to be ( you might want to dial exposure compensation down by -1 EV or whatever feels right).
Using light meter
Aside from meters in your cameras (TTL), there are also light meters
There are several modes on light meters:
- Daylight / Ambient Mode
You should use this mode when you shoot anything with continuous, constant light (like the Sun)
- Auto Reset Cordless Flash Metering
This mode allows you to push the button and it waits (about 90 seconds) for the flash to fire
- Cord Flash Mode
This mode allows you to plug in the sync cable to meter and to flash so when you push the button on the meter the flash will fire
- Wireless Flash Radio Triggering Mode
When you take a meter reading, it triggers your flashes wirelessly. (Check for Best External Flash
It’s very important that your exposure triangle (shutter, aperture and ISO) is set exactly the same on your meter and your camera. A lot of meters, out of the box, are set it half-stop increments, but most of the cameras move in third-stop increments. It’s very important for this to be set correctly too, so you should adjust your meter to either move in half, full or third-stop increments, according to your camera.
Normally, when you use a light meter you are using incident metering where the light hits the LumiSphere. If you want reflective metering that is a little bit different. For that kind of metering, you use a spot meter that a lot of meters got built-in. you hold it up to your eye and when you see a little circle target you place it exactly where you want to meter. The light that is coming and hitting your subject will bounce off and come into the meter itself.
So, once again, metering is nothing but measuring the light that falls on or reflects off of your subject. I hope that you understand now how metering works and that it just takes practice. Now go and play with the exposure!