Related Articles


Taking photographs under well lit or bright condition is fairly easy. However, when it comes to low light the camera starts to struggle. For most beginner photographers, the demanding situation exceeds their skill-set. In this blog post, you will find easy to follow and practical tips and tricks for low light photography to help you to get better photos.
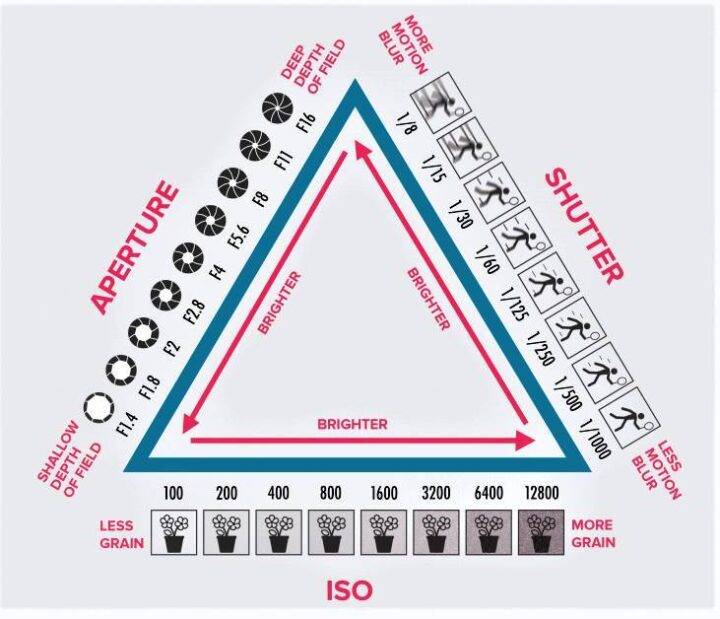
ISO, SHUTTER SPEED, and APERTURE
What is ISO?
It indicates how sensitive the camera sensor is to the light.
What is Shutter Speed?
It indicates how long your shutter is open, allowing light to reach the sensor.
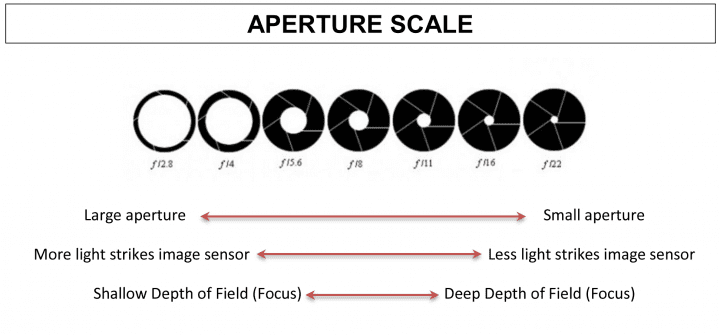
What is Aperture?
It is the diameter of the lens opening which controls how much light gets to the sensor. See below for comparison.
Get the basics right
Before we get into detailed tips, here are three basics of photography that is applied in all kind of photography situations. ISO, Shutter Speed, and Aperture together are called the triads of Photography. You must understand these terms and how they affect each other. A change in any one of these can be compensated by the other two to create a balanced photograph. ISO, Shutter Speed, and Aperture together are represented by Exposure Triangle.
Adjusting for different low light situations
The exact settings of ISO, Shutter Speed, and Aperture depends on the kind of photograph you want. For example, long exposure photography needs longer shutter speeds (1-30 seconds) while keeping ISO under the camera’s limit (ISO100-ISO400 for entry-level cameras) and Aperture at a reasonably small (f5.6 – f8) setting to get better depth of field. For fast moving action like sports or wildlife photography, you will need a fast shutter speed which freezes the action. However, all three can be adjusted to get the final photograph.
Once you have a basic understanding of how light affects the camera setting required for balanced exposure in photographs, just follow the tips mentioned below. This will help you get better photos under low light situations.
List of Tips for
Better Low Light Photography
- Put your camera in Aperture Priority mode, this will ensure that you control all available options. Aperture priority mode is where you can control your aperture of the lens. Wide opening allows more light to hit the sensor but with a smaller depth of field. The camera decides the rest of the settings. However, a slow shutter speed may result in blurry images if the subject is moving.
- Crank up the ISO. This may result in an image with additional noise, but this can be fixed with some post-processing up to a level. (Shoot in RAW if the option is available).
- Slow down the shutter speed. The longer the shutter is open the more light that will get in. Avoid going too slow if you don’t want to blur your subject. Anything slower than 1/80th of a second without a tripod may give a blurred image.
- Use an off-camera flash or light source. Try to direct the light so that it doesn’t hit the subject straight on and creates harsh shadows. Bouncing the light helps to soften it. Read more about flash photography.
- Use your camera exposure compensation capability. The scale on many of today’s DSLRs allows from -3 to +3 stops in 1/3 stop increments. Dial the exposure compensation to the positive side to purposefully ‘overexpose’ the photograph.
- If you are taking photos of non-moving objects or shooting stars then use a tripod along with a remote shutter release or use a timer to take the photograph.
- Shine a light on your subject and autofocus on that, then turn your light and autofocus off and then take pictures.
- Do not be afraid to turn up your ISO, crank it up as high as you need, do not worry about the noise, get the shot.
- When using a flash bounce the light off a wall or other object will help to reduce harsh shadows on your subject.
- Motion blur can be a cool effect, experiment with a moving subject, and a longer exposure time.
- If your camera has lens stabilization then make sure it’s on.
- The handheld shot should not be slower than 1/60th of a second otherwise use a steady surface to reduce blur.
- Get a 50mm f1.8 lens. A 50mm f1.8 lens is the cheapest light sucker and one of the sharpest lenses.
- If you aim your camera towards the north star while taking a long exposure, the stars will appear to spiral.
- Brace yourself and your camera against the wall, ground, or another solid object to get stability.
- Relax when you hold your camera, a tense hand causes more shake than a relaxed hand.
- Avoid zooming in on your subject. Even the slightest shake will lead to a blurred image when zoomed in on the subject. Use a good Tripod.
- Take a deep breath, hold and click the shutter button to take a photograph.
- Triple tap shutter. Make a habit of taking more than one image. That way you will have more chances of having a perfect photo.
- Always hold your camera closer to your body and use a viewfinder. This aligns the center of gravity well to reduce the camera shake.
Read more Tips for taking better Photographs.
I have read in a bunch of blog posts that the excess noise added by the cranked up ISO can be cleaned during post-processing. What kind of post-processing are we precisely talking about?
Thanks
“Thanks for these useful tips & tricks……i am a beginner….and i want to know about post processing softwares….”
Photoshop > Camera Raw
I blog frequently and I really appreciate your information. This great article has really peaked my interest.
I am going to book mark your blog and keep checking for
new details about once per week. I opted in for your Feed as well.