Related Articles


How To Use Histogram To Get Perfect Exposure.
Live Histogram is one of the most useful feature that is present on most of the Digital Cameras. They are available in most of the photo processing software. It is also one of the most under utilized feature mainly due to the lack of knowledge about how to use a histogram. Photography is a process where you continuously learn and develop new techniques which further improves your capability as a professional photographer. How To Use Histogram To Get Perfect Exposure.
To understand a histogram let us see what exactly it is. A histogram is a graphical representation of the tonal values in a photograph. It shows the amount of tones of particular brightness found in your photograph ranging from black which means 0% brightness to white which means 100% brightness.
A camera’s histogram is an accurate guide to exposure, as it illustrates the range f tones, or brightness levels, present in an image. You should develop a habit to review histogram whenever you take a picture, so that you can access if you need to make any exposure adjustments.
Let us see a typical histogram and understand the different parts present in a histogram.
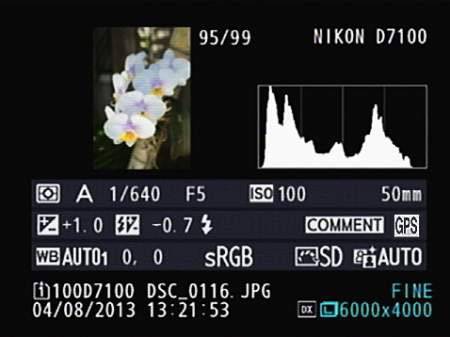
As you can see there is a box present on the image details panel which shows the histogram information. This information display can be turned on or off from the settings menu in most cameras.
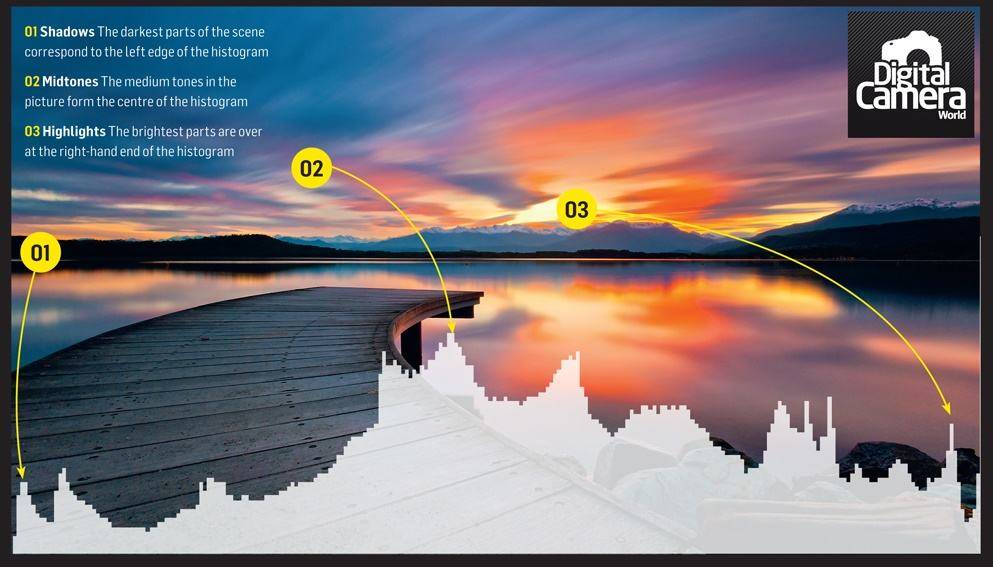
The histogram is a two dimensional representation about the tonal range of an image. Y-axis represents the number of pixels and x-axis represents the tonal range. Darker tones are represented on the left side, middle tones in the center and lighter tones on the right side. In the histogram above most of the pixels are present in the middle reason. This means the photograph is evenly exposed and there are almost no over exposed pixels or underexposed pixels on extreme left or right. Normally this will be histogram choice for most photographs, but not when you want to shoot a high-key or low-key image.
So by using the shape of your histogram, you can create different types of photograph. You can use it to create high-key, low-key or balanced photograph. Let us see some more examples to understand the difference.
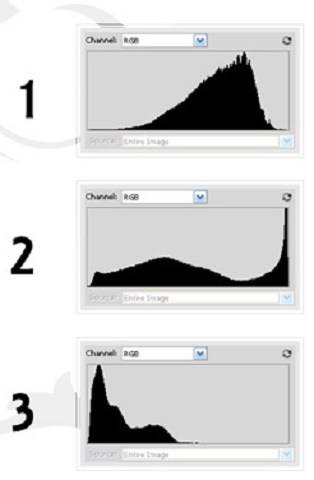
There are three different histograms here. Take a look at them. In the first example, No details are lost in the highlights or the shadows. The tallest bars are near the center of the histogram, and they form a nice bell shaped curve. The histogram shows an image with lots of brighter mid-tone values.
The second example shows a histogram that is spread out over the entire range of tones. The peak on the right shows some very bright whites and even some true white which indicate highlights with no details.
The third histogram shows very dark tones and no bright areas at all. However There is very little true black in this image and no true white at all.
So based upon what you know about histograms so far – which one of these three is correct?
That’s a trick question. The fact is, the histogram is nothing more than a tonal range captured by the image sensor inside your camera. It can not tell you if the image is right or wrong. An image of city taken at night may have lots of true black and blown highlights where the lights are. There is nothing wrong with that. Similarly an image taken against white background.
Now let us see real world examples and application of histogram in photography.
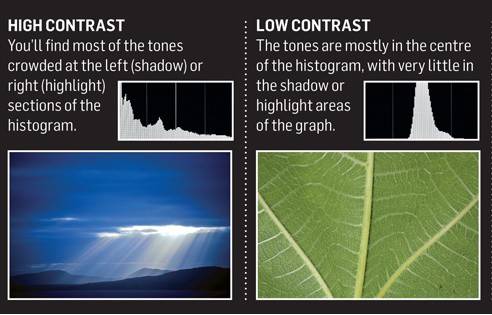
High Key vs Low Key Photography and their histogram.
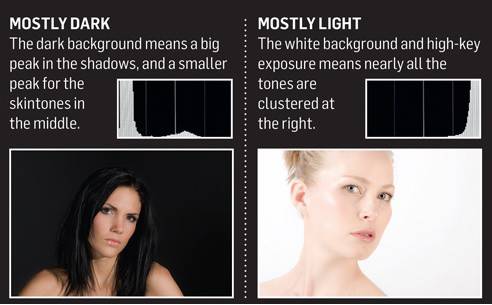
High key photography is also useful for product photography where you do not need any detail in the background and only want to highlight the product. Similarly low key photography is used in studio portraits where you want to show all features and contrast of the subject.
Overall, using histogram will not make you less or more of a professional but it will surely help you to understand the basics of an image and can be used to your advantage to get the image perfect. Not all photographers find time to keep looking at the histogram after taking every photograph. So it may be useful for those who have time on hand like studio photographers or when you are post processing an image. Either-way it is a great addition to your photography knowledge and skills and it’s good to be aware of basics.
Note: While shooting, the in camera raw histogram represents the on-screen preview image in jpeg with settings and not the values of the raw files. For this reason it is that when you open the file in the raw module often observe significant differences.
We hope that How To Use Histogram To Get Perfect Exposure was useful for you. Let us know in comments below if you have any questions.