Related Articles


One of the major issues with amateur photographers is that they hold the DSLR or any camera with the wrong grip and incorrect posture. This leads to a camera shake and the photographs are not sharp. By holding the camera properly you can avoid and minimize the effects of camera shake. Even the smallest camera shake is visible when you maximize the photo. For tack-sharp results read this article on How to hold the camera properly.
How to Hold a Camera?
Camera shake can be avoided or minimized by holding the camera with both hands while bringing it close to your body. Use one hand to hold the camera and the other hand to support the lens. Keep your elbows close to your body for support. Stand with one leg spread outwards and the other leg stretched back. To lock your position you can ben your front knee. Bring the camera close to your eyes. This ensures a well-aligned center of gravity. The posture is stable for a sharp photo.
A good and firm grip with the correct hand and support from underneath means that, when you press the shutter release button, the movement of the camera will be minimized. This will enable you to shoot sharper pictures while maintaining relatively slower shutter speeds. The idea is to bring the center of gravity close to or inside your body. It is much like driving a bike while sitting on it but in simpler terms.
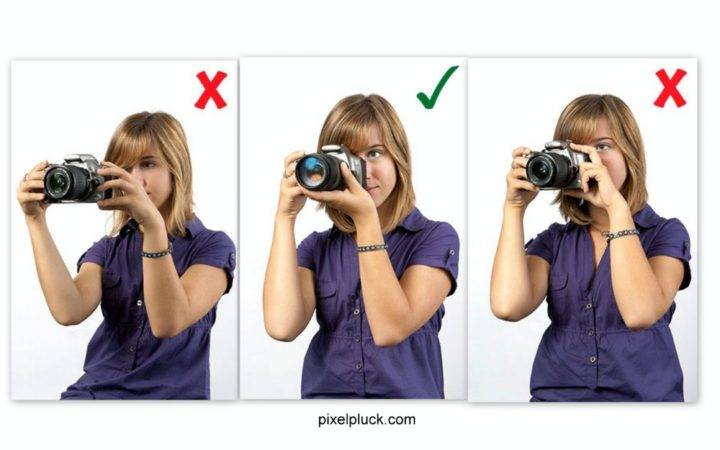
Example of Holding a Camera Correctly
In the example below, the picture on the right shows a good grip, the heel of the left hand supports the camera from underneath. When the shutter is pressed with the right hand, the camera tends to move downward, the left hand in this position will compensate for any movement and will minimize the effect of this.
The position of the shutter button on all the cameras is similar. This means that you can use the same grip for all kinds of DSLR cameras. For compact cameras and smartphone cameras, you must hold them using both your hands. Enable touch to focus & capture on the smartphone. This minimizes the number of steps involved and ensures a quick, rightly focused, and sharper image.
Here are additional tips that you should keep in mind while shooting photographs with your camera.
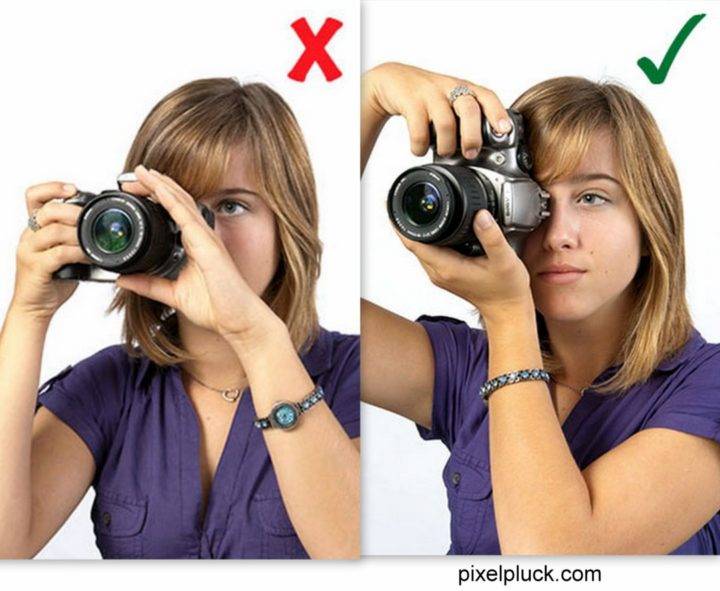
Using A Viewfinder to Reduce Camera Shake
Use Left Eye to See the Outside Field of View. Almost all cameras are designed to be used with the right eye (unless it’s custom-built), although it is possible to use them with the left. The advantage of using the right eye is that the left eye is not blocked by the camera body or viewfinder and you can if you want, keep it open to see what is going on outside of your field of view. The natural tendency is to shut your left eye, the better to concentrate on your picture. With a little practice, you can get used to keeping it open.
Having the left eye open enables you to see what is about to move into your frame, a useful thing when taking action shots. Also, you can see what happens at the time when the exposure is being made and the mirror is blocking your view in the viewfinder.
Viewfinder vs LCD Display
In cameras without a viewfinder needs to be held with both hands. But, as you can see, there is no real support under the camera, so a camera shake is more likely. Also when you want to adjust the zoom, you have to re-position your hand. The market is flooded with entry-level cameras without a viewfinder, you have to look at the LCD screen to compose your picture. As a result, some people find it more ‘natural’ to view in this way. But now you are holding the camera in a very unstable way.
Holding a Smartphone Camera
Ultra compacts and smartphones have made matters even worse. Now you have to hold the camera with your fingertips, away from your face. You really need steady hands to hold a smartphone camera absolutely still. The only way is to find some support for your elbows as in the picture below. Just follow the basics and provide support to your elbows on your body. This will create support and the smartphone camera will take sharper photos.
Holding a Camera with Telephoto Lens
When you use a telephoto lens, the need for support from underneath becomes more urgent. Not only because the weight distribution is now tipping the camera forward but also because the narrower angle of view will accentuate any camera shake.
The ‘good’ way of holding the camera recommended in this article translates very well to the portrait view as well. A lot of people take all their pictures in landscape format simply because it feels uncomfortable to hold the camera in the upright position. Holding it this way feels very comfortable. Wherever possible I would recommend using any extra support available. Especially when shooting in low light or with an average camera phone or entry-level DSLR camera.
Holding the camera by the body only (left) means that when you move your hand to adjust the zoom, the tendency is to do it ‘over arm’ with your fingertips, as in the picture on the left. Whereas an underarm grip cradles the camera in the palm of your hand, taking all the weight. Holding the camera in the right way might seem a little uncomfortable at first but in a very short time, it will seem the most natural thing in the world.
Camera Straps for Stablization
You will notice that there are no camera straps evident in any of these pictures. If there is even the slightest chance that you might drop your camera, use a strap. Camera Straps are also used as a wrap around the wrist area to built tension. While using it around the neck it creates additional resistance and tension which stabilizes the vertical axis. You can either use the generic camera straps or get yourself a Rapid Hand Strap for ultimate stabilization.
Importance of Holding Camera Properly
A well-held camera makes a lot of difference in finer details and sharpness. Even when there is plenty of light and the shutter speed is quite fast, you can see the difference between a well-held camera and an unstable ‘grab & shoot’ attitude. The difference may be subtle but it will be there to see. People often think that the sharper results from a well-held camera are due to a more expensive camera or lens. Better equipment does give you better results but only when you know how to use it properly.
Using a Tripod
A good quality tripod is an ultimate stabilizer. It will not only reduce the camera shake but also make your hands free. All you need is to set the correct parameters and press the shutter button. Not all shooting conditions allow the use of tripods. Tripods can be used for landscape and portrait photography. It is better to shoot handheld than to use a low-quality tripod. Tripod is a one-time investment and is totally worth it if you shoot a lot of portraits and landscape photos. Two of the best value-for-money sturdy tripods in the market are Vanguard Alta Pro BallHead and Manfrotto 290.
Position of Legs
As discussed earlier, the position of your legs is as important as holding the camera and right posture. When we are shooting a photograph our legs act as a duopod. Separating the legs and creating optimum distance ensures additional stability. Opening your legs puts the center of gravity close to your body and hence it is a recommended position. Also lowering your stance and putting your legs in different lines (half a step ahead) is helpful in stabilizing the camera. Make sure that your legs are bent outwards at an angle.
This concludes our tips on how to hold the camera properly. Let us know if you have any helpful tips in the comments below.
Read more: Photography Basics Tutorials here
Find the Best Lenses to Upgrade from Kit Lens here.
Your portrait holding method is the way many photographers hold the camera, and it is incorrect.
B&H offered a very good explanation and method in one of their tutorials.
The best support for portrait mode is to not have your elbow pointed toward the sky, but rather tucked in close to your body. This allows much better support.
The shutter is then released with your thumb.