Related Articles

Last Updated on November 9, 2020 by PixelPluck
DSLR cameras are more affordable now than ever. An entry-level DSLR camera costs only as much as a smartphone. However, the photograph quality and control that you get over a DSLR can never be matched by a smartphone camera. If you already have a DSLR then you can learn 25 DSLR Tips & Tricks to Improve your Photography from this blog post.
There are multiple tips and tricks for a DSLR camera which will help you get the most out of a DSLR and produce better results. Here is a compilation of twenty-five DSLR tips and tricks to unlock the full potential of your DSLR camera. These tips and skills work on almost all the DSLR irrespective of brand. These tips and tricks to improve DSLR photography will work on both Nikon and Canon DSLR camera systems. You may be familiar with some of these so skip directly to the tips that you did not know.
25 DSLR Tips & Tricks to Improve Photography
- Manual focus
Sometimes the IQ of the Camera fails to decide the exact point to focus. To adjust this turn the manual focusing switch ON and rotate the focus rings until you get it right. Also, it’s a faster way to get the focus spot on. Most Kit-lenses either have a slow focusing mechanism or struggle to focus in low light. In wildlife photography, both have advantages and disadvantages. Imagine a bird sitting right behind a few branches on a bushy tree. In such a scenario, auto-focus will mostly focus on the branch. Using manual focus will give you better control in similar situations. There is another option of a manual override in some lens or camera bodies, where the camera will auto-focus but you can override the focus manually if it’s not perfect. - Half pressing the shutter
This is a trick which either most of the beginners are unaware of or fail to execute. The shutter of the camera works on two levels. Half pressing it will lock the focus and will give you a green signal or beep to notify that the subject has been locked. If you are using the viewfinder then the focus points that are locked will illuminate with square boxes. On LCD display it will show green boxes on focus points. Pushing it all the way down without releasing from the half-pressed position will take the photo. If you don’t get a go-ahead green signal after pressing the half-shutter, redo it. This feature is not available if you are in a manual focusing mode.


- Eyepiece diopter adjustment
People using spectacles can shoot without them. There is a small knob for diopter adjustment right next to the viewfinder. Turn this little knob to match the value of your eyeglass or until it shows the correct focus. This will allow you to use the viewfinder without your optical glass. It usually ranges between +3 to -3 or +5 to -5. So if you have been prescribed optics that are above the specified value then it is better to use your glasses.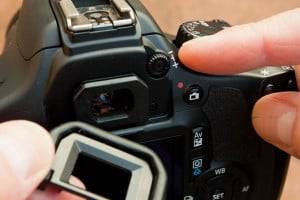

- Custom Settings
If you shoot some subject repetitively in the same manner, then you can store your settings in the custom settings button on the mode dial. For example, if you shoot Portraits indoors regularly under the same lighting conditions then you can store the settings under the custom mode (C1, C2 for Canon, and U1, U2 for Nikon).

- AE-L/AF-L button
Your camera locks the auto-focus and auto-exposure when you half-press the shutter. So why do we need a separate AE-Lock and AF-Lock button? Because we can separately decide to lock either exposure or focus and not both. - High ISO
It’s not recommended to use a very High ISO especially on entry-level DSLR or mirrorless cameras. But most DSLR cameras are capable to go beyond ISO 6400. Even the professional DSLR cameras start to show grains and noise above 6400 ISO. For entry-level DSLRs, around 1600 ISO will give a huge amount of noise and grain in the image.
Increasing ISO value increases the sensitivity of the sensor inside the camera. This means it can see even in a darker situation. But as you will increase ISO value, the number of grains on the image will also increase. In a few situations where there is complete darkness, it will at least give you something. Something is better than nothing. Besides you can decrease graininess in post-processing up to a limit. - sRGB vs RGB
sRGB is the world standard for digital images, printing, and the Internet. So long as you haven’t screwed with anything, you and the world are shooting in sRGB.
RGB or Adobe RGB squeezes colors into a smaller range (makes them duller) before recording them to your file. Special software is then needed to expand the colors back to where they should be when opening the file. Adobe RGB may be able to represent a slightly larger range of colors, but no screen or print material which you are going to use in day to day life can show this broader range. Here is a detailed explanation if interested.

- RAW options
A camera raw image file contains minimally processed data from the image sensor of a digital camera. RAW files are named so because they are not yet processed and therefore need to be processed using any RAW capable software. Raw image files are sometimes called digital negatives, as they fulfill the same role as negatives in film photography: that is, the negative is not directly usable as an image, but has all of the information needed to create an image. Using RAW will give you more control over how you want the photograph to look. Read JPEG vs RAW here. - Firmware Updates
Keep your DSLR up to date with the latest firmware. Usually, new cameras get frequent firmware updates to remove any software related error which may have been reported after the rollout. You can check the firmware number in your camera menu and confirm the latest firmware on the website of that model. Updating the software firmware version is easy and you can check the steps here. Newly launched lenses will be incompatible if you don’t update the firmware. - Embed copyright Information
Most DSLRs have the option to embed copyright information in the image via the camera settings. Check out your camera manual if your DSLR supports it, or drop us a comment below and we will find it for you.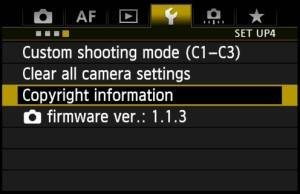

- Noise or grain reduction
There are inbuilt settings in the camera menu to reduce the grain and noise both before and after the image has been shot. However, it will take a considerable amount of time for each image depending upon exposure length. You can post-process using denoise software to remove some amount of grain. - Faster cards
Using faster memory cards improves your camera processing time. It will also increase the burst shooting capability which is useful when shooting fast-moving subjects like sports or wildlife. Cards have a number on them like ‘Class 2′ ‘Class 4′ ‘Class 10′ etc. The higher the number the faster the card. Some extremely fast cards have different nomenclature or they directly show the transfer speed like 45MB/sec, 95MB/sec, 170MB/sec, or even 270MB/sec. It is better to get 64GB and above as it will have enough space to accommodate RAW as well as JPEG files from the DSLR. SanDisk 64GB Extreme PRO SDXC UHS-I Card is one of the best cards available at an affordable price. - Flash diffuser
Most DSLRs have an inbuilt flash. Using direct flash may produce harsh shadows and the subject may look flat. You can use a small diffuser to soften the harsh light. If you don’t find a mini diffuser just wrap a white tissue paper around and you are good to go. - Close-up filter
If you can’t afford a dedicated macro lens then don’t worry. You can get similar magnification with some cheap filters available online. The downside of using a macro filter is that you will have to close down the aperture to a small number like f8 to f11 to get good depth of field (entire macro subject in focus). This means that more light will be required and you will either need to illuminate your macro subject or boost your camera ISO. You can buy a cheap ring-light if really interested in macro but don’t want to blow your budget. - Lens hoods
Lens-Hoods have two functions. It reduces lens flare which is due to light rays coming at an angle from the sides. Lens hoods also act as lens (front element) protectors by taking the first impact against bumps. - Get a Camera grip
There are some major reasons to get a grip if you shoot professionally. Camera battery grips provide you the ability to carry an extra battery inside them while balancing the weight. Grips are useful to balance the weight of the camera when using a longer lens. They are convenient if you often shoot in portrait mode. It also makes you look like a pro if that is what you care about. - Rain-covers
If you are out in rough weather, then better get a rain-cover. DSLR rain covers are inexpensive and can be extremely helpful in rainy seasons. Rain covers are also handy in situations where there is a lot of dust. Shooting festivals of water and color then rain covers are a must-have. - Time-Lapse
If your DSLR supports timelapse mode then you can create cool timelapse videos with simple software. If there is no inbuilt setting for timelapse then you will need an external intervalometer. It is inexpensive but a handy tool for shooting time-lapses as well as long exposures. - Auto distortion correction
Most kit lenses and extreme wide-angle lenses have some distortion due to their optical elements. Fix the distortion in the camera itself by using distortion control settings from the camera menu using auto distortion control. Check out your camera manual for details. If you don’t find it then let us know in the comments and we will confirm if it supports or not. You can also remove distortion in post-processing. You can also adjust distortion in post-processing. - Retouching tools
All the DSLR cameras come with inbuilt basic retouch menu settings. Crop, saturate, adjust contrast, remove red-eye, etc inside the camera itself using the inbuilt retouching function. It is handy when you don’t have access to computers to do basic retouching. - Slow sync with built-in flash
Sometimes there are situations especially during dusk when the subject in front of the camera is well lit but the scene behind him is dark. Use the slow sync function from the flash menu. The camera will take two exposures and blend them to expose both the subject and the background evenly. Keep the camera steady while using slow sync. The subject should remain steady otherwise it will create ghosting in the final image. - HDR bracketing
You can set 3 to 5 different exposure values which are called brackets and then keep the shutter pressed to take images with the same composition but different exposures. The camera will shoot at -2, 0, and +2 or the bracketing steps set in the HDR bracketing menu. Using manual mode will keep all other parameters constant. These 3 images may be imported in software like Photomatix or Adobe to automatically create a High Dynamic Range Image. Don’t overdo an HDR or the image looks posterized. Keep it close to the natural scene. - Use histogram
Most beginners and even professionals ignore histograms. It is a very useful tool to determine the amount of underexposed and overexposed areas in an image. You can toggle the setting in the DSLR menu to show or hide the histogram. Learn how to use the Histogram correctly here.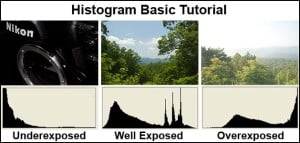

- Sensor cleaning
Keep your sensor clean and dust-free. Take it to a professional if you see dust particles on your images. You may even clean it yourself but you will need a good quality sensor cleaning kit. Sensors are the most delicate part of the camera and often expensive to replace. Don’t poke your DSLR sensor if you don’t know how to use a camera cleaning kit properly. Get Sensor cleaning tools here: Sensor Cleaning Tool
- Lock images
There are chances that you may be tempted to press the delete all option on your camera while deleting photos on the memory card. Sometimes it means losing an important image that you don’t remember. Make a habit of locking your best images to avoid deletion by mistake. Remember that if you press the format button then all the images will be deleted irrespective of lock status. There is also a small physical lock key present on memory cards that prevent accidental deletion. Toggle it to lock position to make it write and read-only.


Once you master your kit lens then upgrade to a prime lens to discover the full potential of your DSLR camera. Here are the best lenses to upgrade from your Kit-lens.
Check the best DSLR and Lenses OFFER HERE.![]() Hope you learned something new after reading these quick tricks and tips.
Hope you learned something new after reading these quick tricks and tips.
Do share in the comments below if you want to add any tips.
How do you tellor see how many exposures I have taken in total with myD3000 as my censor is packing up thanks Olso have ou done a update detailed tutorial on how to use a histogram in your upcoming posts. Thanks again Vic
How to get better tone in daylight and lowlight situation and tell me fine tune and white balance setting of my nikon d7000.
How do I add a watermark logo on a photograph on a Canon??
You can use any simple software like MS-Paint or Picasa. Use photoshop or lightroom for lossless editing.
For in camera setting:
In Canon 600D (all canon cameras have similar method), take these steps:
1. Set the camera Mode dial to P, Tv, Av, M. You can create or modify copyright information only in P, Tv, Av, M, or A-DEP exposure mode.
2. Display Setup Menu 3 and highlight Copyright Information.
3. Press Set & Select Enter Author’s Name and press Set again.
4.After you finish entering your name, press Menu.
[Done]
5. To check the accuracy of your data, select Display Copyright Info and press Set.
helpful! And very interesting. Thank you!
Oh my goodness! a tremendous article. I am continually browsing online for tips that can help me. You are a very persuasive writer. Your 25 tricks are amazing! Thanks for sharing