Related Articles

Last Updated on September 23, 2017 by PixelPluck
10 Reasons To Shoot in Manual Mode
We all start in AUTO mode. Beginners love to shoot in Auto mode and understandably so. It is easy and does the work in most cases. When you are in auto mode most of the parameters like aperture, ISO, shutter speed etc are automatically set by the camera. In most of the cases it does the job. Auto mode is good for photographers who are amateurs and learning how the camera works. By looking at the settings that your camera applied you may learn how a particular setting affects the final result. Read on for 10 Reasons To Shoot in Manual Mode.
All amateurs must learn the manual mode once they become comfortable with the camera menu and settings. Manual mode let’s you become creative and explore new possibilities with your camera. You can do many DSLR and photography tricks when your are in manual mode. It lets you have greater control over the individual parameters like aperture, shutter speed, ISO, focus points and even metering. All these parameters may affect your image differently. You can modify settings to get desired result.
Here is a helpful image to get you started with basics of Manual Photography.

Manual Mode is basically turning off a few features that camera decides for the scene and controlling it manually to get exactly what you decide. Until you start using manual modes, you can’t use your camera to it’s full potential. It a wonderful way to learn and experiment. Even if you don’t get the desired results early on, you will learn quickly.
Here are the Top 10 Reasons to Shoot in Manual Mode.
- You Control the Depth of Field.
When you are shooting in manual mode, you have the control over the depth of field in the photograph. The depth of field is nothing but the focus window. this simply means how much part of the image is in focus and how much is out of focus. As you open up the aperture ( f8<f5.6<f3.2<f1.8 ) the window of focus or the area in focus decreases. This is very handy when you want to avoid distracting background or foreground. It will cause nice soft blur specifically in the area which you want and not what camera thinks. Read Depth of Field / Bokeh Tutorial here. - You Control Shutter Speed.
Whenever you press and release the capture button, you trigger a mechanism in camera which is called shutter release. This happens very fast or may take long depending upon the shutter speed. A basic DSLR camera like a Nikon D7500 or Canon 750D can capture image in 1/8000th of a second or may also extend for few minutes when you are doing long exposure photography. On AUTO mode your shutter may not be fast enough to capture the wings of a Humming Bird. With manually setting a fast shutter speed you can overcome this limiting factor. Similarly you can capture star trails and landscapes at night by allowing a very slow exposure in minutes. This may create surreal photographs and capture light movements which you don’t see in real time. You can also choose to stay in between (half or quarter of a second) and create a motion blur or pan shots.
 - Limit Noise or Grains in the Photographs.
The grains or noise in low light images are pretty annoying and rightly so. They destroy the details in a photograph. It also effects the color temperature of the photo. To reduce the level of digital noise or grain on image you can set the upper limit for ISO in the camera menu. You can also set it at specific value which is good enough for the image without stretching the capability of your camera. High End DSLRs like Nikon D850 or Canon 5D Mark IV produces very little or unnoticeable digital noise even at relatively higher ISO values. ISO is nothing but the photo-sensitivity level of the sensor on the camera. As you increase it, it can work in lesser light but at the cost of digital noise or grain in your image.
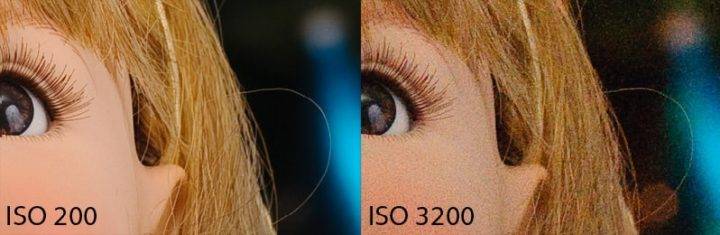

ISO 200 vs ISO 3200 - You can Choose Exact Point of Focus.
In modern DSLR cameras there are many possible focus points which are arranged horizontally as well as diagonally. Professional DSLR cameras have more focus points then basic DSLRs. This means that a camera with more focus points and coupled with a better processor and other sensors can perform faster auto-focusing. You can manually choose how many focus points to use when you are out shooting. Usually for fast moving subjects it is wise to activate all focus points and for steady subjects like portrait and landscape you can use lesser focus points.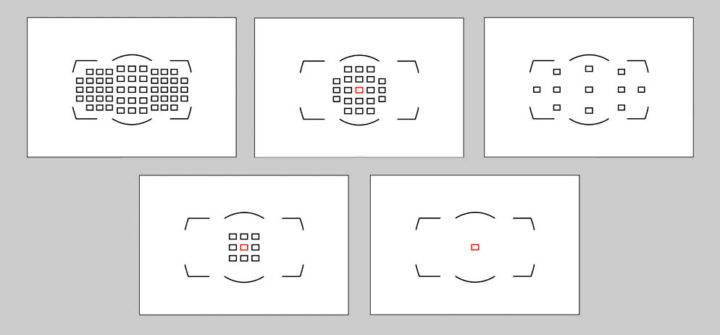

Various Options for Selection of Focus Points on a DSLR camera - Manual Mode is Fast.
Yes you read it right. Your camera’s IQ is lower than yours. It can misinterpret a scene you may have to redo the shoot. When you are in manual mode you already know what the result is going to be like. You only need to make minor adjustments. - Manual Mode is Best for Flash Photography.
You you are the person who loves playing with lights then this is definitely your thing. When you are using flash it becomes hard to achieve the perfect light. Using a good combination of aperture, shutter and ISO you can use flash very well. And since photography is all about light, you must be good with it. Manual Mode along with a flash helps you to balance the light to your taste. Check out Top 10 External Flash here. - Manual Mode is Predictable.
When you are shooting in Manual Mode you know what your result is going to be like. This makes the workflow and adjustments faster. Once you have the basic understanding of the exposure triangle you will often go to manual mode. When in manual mode, there are hardly any bad surprises. - Utilize your Lens and DSLR to it’s Full Potential.
If you have got a prime lens after getting familiar with kit lens, the auto mode will never do justice to the potential of your prime lens. Prime Lenses are better than kit lenses and you must use them to their potential. Otherwise there’s no point paying a premium for a prime lens. We are sure you are not just a lens or camera collector!! Read about the best lenses to Upgrade from Kit Lens. - Shoot in MANUAL + RAW.
If you want to utilize the full power of digital photography then you should also be shooting in RAW format along with your usual JPEG format. RAW format images are few times larger in size as they contain a lot more information in the image than the JPEG. You can also adjust many different exposure related parameters after taking the image. You will need to use a software like Lightroom, Photoshop etc to process the RAW files. Read more about RAW vs JPEG here. - Manual Mode is your Best Teacher.
When you are using manual mode you always learn something new. Be it making slight adjustments to get the perfect light or getting creative with silhouettes by cutting foreground lights. Manual Mode on a DSLR is license to be creative. So take your camera out, stop being afraid of the manual mode and learn by doing. Make mistakes, make adjustments and make some great photographs which you can be proud of. When you shoot in manual you earn the full rights over the image and it’s not just your DSLR which is at work. You do the thinking part and the DSLR will do the rest.


You should not just snap a image but you should create from scratch, all inside your camera but at your commands and inputs. The output photograph will be a reward for you.
Do you have any tips to share with our visitors? Do share in the comments below. What do you like the most about shooting in manual mode? Tell us if it was useful for you and what would you like to learn more.
It is a good
I likedit
This is really good article on when and how to shoot manual mode. this is the best way to get the best out of your camera .. but in some situation I still feel auto mode is best where u don’t have enough time to set focus manually like birding.
thanks for sharing this article… tooo good