Related Articles


Last Updated on December 2, 2016 by PixelPluck
How to Shoot Portraits for Business Profile
Here are some tips for you to shoot a head-shot portrait for business profile of any person. Learn How to Shoot Portraits for Business Profile. First of all you need to understand the requirement of your client. Traditional business portraits are no nonsense shots which makes immediate impact. But if your client is a new age media person then they may wanted to look “fun, intelligent, and in the city” – so no office at all. Plan accordingly in advance. Avoid distractions in the background in both cases and use shallow depth of field when you are shooting outdoors. The photograph should be properly lit and use external speedlites  if required. Ask your client how they want their LinkedIn profile photograph. This will give you an idea about what they are looking for. As a photographer it’s your job to suggest if there is any change that is required.
1. Shoot Vertically: Your first instinct when picking up a camera can be to shoot horizontally. Try composing vertically. It focuses attention on the subject and can make the subject look more impressive. The line from the top of a human head to the collar bone is about 2-3x the line at the widest horizontal running ear to ear.

2. Shoot from Below, Looking up at the Subject: Putting your subject on a higher level than the camera, makes them look more powerful. If you shoot down on someone they look smaller.

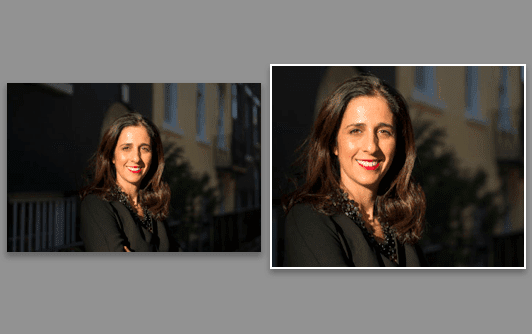
3. Fill the Frame: Even when you are taking an environmental head-shot where the background adds to the photo, you don’t need much background or foreground for a corporate head-shot. I took this shot for a friend of mine in real estate. She told me she wanted to showcase the neighborhood and properties she worked. When selecting the final photo, she found that she preferred a closer crop. This holds even more true when you are working with a solid white background.
4. Focus on the Eyes: Make sure eyes are in perfect focus and that they shine. This particularly important if you’re using narrow depth of field. Catch-lights are important. If you are shooting at their office, place the subject near a window. If you have access to lighting equipment, pay attention to the number and size of the catch-lights.

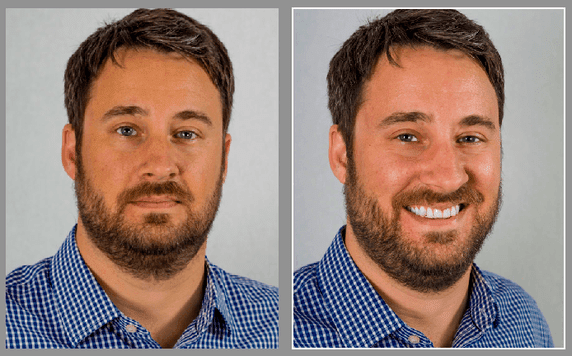
5. Avoid Mug Shots: People often freeze in front of the camera. Your subject may come out looking “too serious.” Sometimes this is what they are looking for. If you prefer a smiling subject, talk to the subject, keep snapping, and get them comfortable. It takes some people time to warm up to the camera.
6. Shoot with a Longer lens: A longer lens is more flattering. So pay attention to the focal length and your subject’s distance from the camera. If possible use at least 85mm , and place your subject at least 6 feet away from the camera. If you use a short focal length and your subject is too close to the camera, it will exaggerate the depth of features, especially the nose. Following are pictures taken with a 42mm vs 200mm.
However too long of a lens will do just the opposite. It will make the face very wide and shrink the features to the center of the face, the worst of which is making the eyes seem small and close together. 50mm is supposed to be the same as the human eye. Stay within 50-100mm. You don’t want to look drastically different when you meet your prospective employer!
7. Make sure the photo is tack sharp: One of the most important aspects of head shots is making sure the photo is in focus and there is no hand-held blur or motion blur from the subject. For corporate head shots, you’ll typically want a moderate depth of field so that the entire image is in focus. I tend to use f/8 to f/11, which ensures that the entire face, ears and hair are in sharp focus; however, these narrow apertures means that the scene needs to be very bright. It’s tough to do this without lighting or in full sun. In order to get prevent the deer-in-headlights look, you probably shouldn’t use an on-camera flash. If you’re using a narrow depth of field (low-light situation or you want a different look), make sure that the focus is on the eyes.
